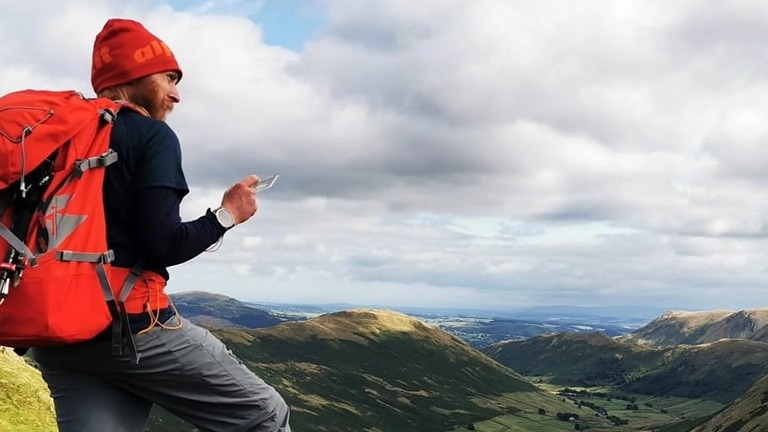
Below I’ve outlined what I carried during my Mountain Leader Assessment, and items I plan to buy now that I’m a qualified Summer Mountain Leader, offering guided walks, navigation training, and bespoke mountain experiences across the UK.
Learn more about my services here.
Everyone will have their own preferences and will add to and remove a few of these items from their arsenal, and your consolidation period will have given you a good idea of what works for you and what doesn’t.
You don’t need to be working towards a formal leadership qualification to find this list useful though, everything on the list has a vital role to play in keeping you, along with your friends and family, safe and comfortable while exploring the outdoors.
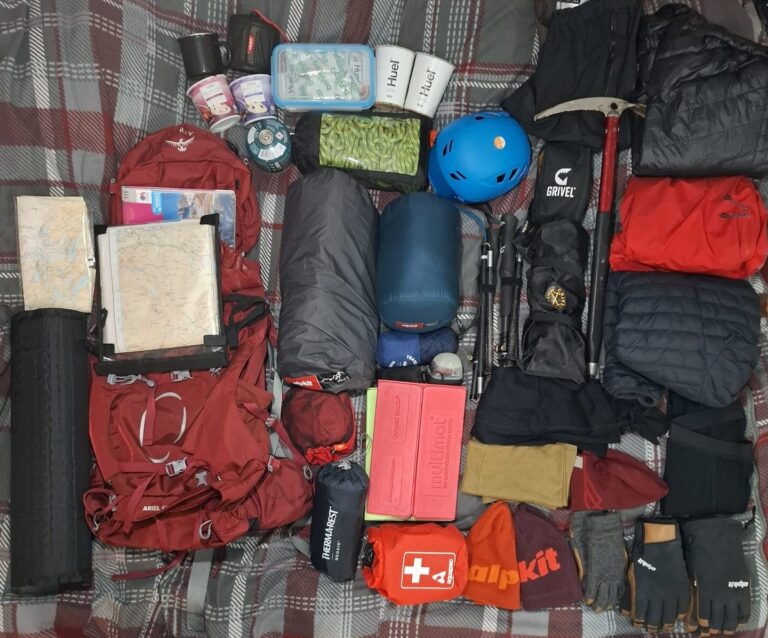
General Kit
- Rucksack – I have a 65L Osprey pack for multi-day expeditions, a 45L Simmond pack for longer days and a 28L Mountain Equipment pack for when I’m going fast and light or scrambling where a large pack might unbalance me.
- Dry Bags – these are great for keeping everything in the rucksack dry and also for organising the various items in the sack.
- Water Bottle / Flask – depending on the prevailing conditions, you’ll want to carry at least 1 water bottle and potentially a flask for a hot drink. Don’t underestimate the need to fluids while on the hill, especially as you’ll be travelling slower than your usual QMD pace so will be out for a full day even if only covering a few miles.
- Poles – Walking poles can reduce joint strain on your legs and improve balance and stability. If like me, you’re still young and agile, these benefits might not sound necessary, but several weather worn outdoor professionals have told me how broken their joints are after years of abuse, so best to start protecting your body now so you can keep getting out onto the hill into old age! I use the Alpkit Carbon Marathon Ultra poles; They’re light and pack down well but be aware that carbon fibre is less forgiving than metal alloy options.
Navigation Tools
- Maps – You’ll need at least two maps of the area in which you’re doing your assessment. In my case, this was OS 1:25k Explorer OL17 and 1:50k Landranger 115. I also carried my Harvey 1:40k British Mountain Map Snowdonia North and took my OS 1:25k Explorer OL18 with me. It’s also helpful to have more than one copy of the maps with you just in case you lose one!
- Map Case – Although most of my maps are the Active (waterproof) versions, I tend to also use a map case to help me keep it folded to the section I’m using and tethered to me.
- Compass – The recommended compass is the Silva Expedition 4. I own two of these and normally keep them tethered to each of my rucksacks. During assessment though, I carried one as a spare in the top of my rucksack, again, just in case one got lost, broken or demagnetised.
- Watch – You’ll want a watch to help with timing your legs, and generally just knowing whether it’s time for lunch yet! I used my Garmin Fenix for this, but anything robust enough to survive in the outdoors will do. Do just check your assessor is okay with you wearing a gps enabled watch and obviously don’t use it for navigation.
- Pacing Beads – I have 6 spring loaded toggles on each of my compass tether’s, which I use to help me keep count of how far I’ve walked; Every 100m that I pace out, I move one bead and start counting again – one less number to remember when I stop to chat!
- Pen – I use a fine tip sharpie to mark points on my map; Be it where I’ve been asked to navigate to, where we changed over leading legs or known points along the route. This helped me to quickly home in on the exact part of the map I need to look at, without needing the thumb the map or remember precisely specific locations.
- Timing Card – I bought a few Mountain Training Timing cards, and attached them to my compasses, quite close to my assessment. Although I’m fairly good at doing the math in my head, anything to help minimise errors is worth it!
Clothing and Footwear
- Waterproofs – I have two sets of mountain equipment waterproofs, one set is Gore-Tex Pro and the other standard Gore-Tex. This allows me to wear the most appropriate layers for the conditions and also lets me dry one set out and wear the other on back-to-back days in the hills.
- Hat, Gloves, Buff – Depending on conditions, you’ll probably need either a warm beanie or a sun cap. You’ll probably also need gloves to keep your hands warm and operational at some point (even in summer, the nights can get cold!). A buff will also serve a double purpose of keeping you warm in wintry weather or providing protection from the sun, A very versatile piece of kit! You’ll also want to carry multiple pairs of each of these – you might lose one, someone else might lose one, or you might have a few different hats / gloves to suit different temperatures. I have three pairs of gloves from Alpkit: Gabbro, Frazil & Mica which cover most eventualities!
- Clothing – This will depend a lot on the season you’re walking in and the likely conditions you’ll encounter. I literally took my entire outdoor wardrobe with me, so I had everything to hand, but you’ll want multiple pairs of walking trousers, several base layers of different deniers and mid layers to help regulate heat.
- Boots – By this point, you should be well accustomed to your boots. There’s no right or wrong answer here, but you might choose to wear a stiff B2 boot (I wear La Sportiva Aqualibriums), a good quality leather boot (I also wear Meindl Bhutan’s) or you might prefer to wear a lightweight trail shoe (several people I know wear Hoka models). Whatever you choose to wear, be prepared to justify it to the assessor and also be able to explain the options to a client. I also chose to bring both pairs of boots with me, so I had options based on the days plan and could dry them out if they got wet.
- Gaiters – these are great for preventing ingress of water or debris into your boots. They can also help to prevent ticks from getting up your trouser leg.
- River Crossing – We were advised to carry spare shoes and clothes for the river crossing. Probably worth checking where and when you’ll be doing this, as you might choose not to bother carrying extra stuff if you’ll have a short retreat to your accommodation afterwards.
Safety Equipment
- Helmet – You’ll need to bring a climbing helmet with you for protection when on steep ground. Unless you’re already a climber and have a helmet, just look for something that meets the UIAA-106 standard.
- Rope – similarly, you’ll need a rope for use on steep ground. Unless you’re a climber and already have a rope, something like the Beal Rando will do the job. 30 metres and 8mm is generally the minimum requirement, longer or thicker will be bulkier and heavier.
- Belay gloves – rope burn is painful, and your hands are quite useful. You can get specially designed belay gloves, but a decent glove with a leather palm will do the job.
- First Aid Kit – You’ll have completed a 16-hour first aid course and by now have a better idea what first aid supplies are useful or necessary while on the mountain. I made up my own kit, but you can buy off the shelf Mountain Leader First aid kits. You might also want to have the option of a leader kit and personal kit, allowing you to leave the bigger one out if someone else is also carrying one. Another concept that I came across on my assessment was the Ouch Pouch, containing basic items to deal with minor ailments, allowing the bigger kit to stay buried in the bottom of the rucksack.
- Group Shelter – You’ll need a group shelter big enough to fit everyone in the group. For assessment, this will be 4 people. Going forward, you might plan to take more clients out in your groups and will thus need a bigger shelter. Buying one bigger shelter will cover every eventuality but will also be bigger and heavier. There’s also the option of lightweight shelters that weigh less and pack down smaller, but these come with a price tag!
- Blizzard Jacket – These are multilayer survival blankets that can be worn as a jacket. They’re designed to have superior warmth retention, are waterproof, and as their jackets, they allow you to keep a casualty moving unimpeded if appropriate.
- Sunscreen – hours on the hill could lead to extensive exposure to the sun. Avoid injury in yourself and potentially offer to other candidates or clients to prevent them becoming casualties and needing treatment for sunburn.
- Insect Repellent – insects aren’t just an annoyance, they pose a risk of allergic reactions, infections and transmission of diseases. Most will protect against Mosquitoes which can transmit malaria and Ticks which can transmit Lyme disease.
Camping Equipment
- Head Torch & Batteries – You’ll need to carry a headtorch, at least during the exped for use during the night nav and when in camp after dark. It’s prudent to always carry a head torch though in case you’re delayed coming off the mountain and run out of daylight. Depending on the model you have, you might need to carry a spare battery to prolong burn time available. I use the Petzl Swift RL which has a good balance of light output and battery life, assisted with intelligent Reactive Lighting technology.
- Power bank – This is optional but depending on the electronic devices you’re carrying and relying on, you might need to charge your devices overnight. It’s also a good backup to carry on day hikes, in case you’re delayed on the hill and need to charge your phone while contacting emergency services if dealing with an incident or an emergency contact to let them know when to expect you.
- Tent – there are many options here and come down to personal preference. Small light tents are great for keeping the pack size down but will cost more and potentially less comfort when pitched. Cheaper or bigger tents will come with a weight penalty but are perfectly okay of you’re not planning to be through hiking on a regular basis. I use the Alpkit Ordos 2, which for me is a good middle ground.
- Sleeping Bag – again, there are many options. Down is lighter and warmer, synthetic performs better when wet. Try to match your bags performance rating to the temperature you’re likely to experience when camping out. I’ve used the Alpkit Pipedream 400 down to -7C and above zero and been comfortable.
- Sleeping Mat – a good sleeping mat can make or break your trip and is critical to a good night’s sleep. Not only will it protect you from lumps and bumps on the ground, but it’s also key to providing insulation. I’ve invested in a Thermarest which is quick and easy to inflate with the pump sack included and keeps me warm and comfortable in all conditions.
- Bivvy Bag – You might be asking why do I need a bivvy bag, if I’m carrying a tent? I had the same question until it was explained to me on training week that they’re super useful for keeping your sleeping bag and mat dry in the tent, even if everything else is soaking wet! It’s also useful to have in the bottom of the rucksack in case you find yourself benighted on the hill.
- Stove – Again, there are loads of options each with their benefits and limitations. JetBoil type options will give you a quick brew, but come with a weight and bulk penalty, and can be top heavy when in use. There are others like the Alpkit Koro which is small, lightweight and has a pre-heater for the gas, but this doesn’t come with anything to boil the water in. I combine mine with an Alpkit MytiMug which I only use for boiling water and storing the stove.
- Fuel –This might seem quite straightforward, but there is a choice to be made around the gas mix; Propane has the lowest boiling point at -42°C, Isobutane has a boiling point of -11.7°C, and butane has a boiling point of -1°C. If you’re camping in conditions that might get close to sub-zero, butane alone will start to become ineffective, so you’ll want a mix with a higher Propane and isobutane content. Then there’s the choice of how much to take. A small canister (100g) will be lighter and should last a few days, while you might want to reassurance of a longer lasting 230g canister. If you don’t use the full can, you then have the dilemma of whether to risk taking a partial can or use a new one that you know is full! A workaround here is to note how heavy a full can is and then weigh the partial can; this should give you an idea of how much is left. I’m sticking to gas here, but there are other fuel options available.
- Ignition – A stove and gas can is useless if you can’t light it. Options include matches which might get wet, a disposable lighter which might be unreliable or a piezo lighter, which works on dark magic, can fail if misused, with the piezoelectric crystal having a finite life and will eventually lose its ability to generate sparks (after thousands of uses). I tend to carry a few lighters to mitigate the risk of failure.
- Camp Food – Food and nutrition is a key consideration and again is down to personal preference. Most people will find a brand of dehydrated meals in a pouch that they get on with, meaning you just boil some water and pour in. I personally use Huel products day to day anyway, so taking the hot and savoury meals pre-weighed is convenient for me. For breakfast, I tend to carry instant oats, again to which I just add hot water.
- Drinks in camp – a hot drink once set up in camp is often underrated. It’s probably a simple choice of trying to drink whatever you would at home to limit the variables. I tend to carry sachets of latte and hot chocolate, to which I can just add hot water.
- Cutlery and Mug – You’ll also want to eat with, and drink from. You might also need a plate or bowl depending on what you’re eating. I carry a folding spork that I can use to eat food and stir drinks with. I use my Huel pot to eat breakfast and dinner out of. I carry a separate tin mug to drink from, allowing me to keep the mug I boil water in clean for other uses.
- Water Filter / Sanitiser – You’ll need to collect water from streams or lakes while on multiday trips, as it’s too heavy to carry for the whole trip. There are a few ways to render water safe, including Filtration, Chemical Purification or Boiling. Each has its strengths and weaknesses. I tend to filter water using my LifeStraw into my drinking bottles. I then treat it using AquaProve purification. After this, I’ll drink straight from the bottle, or boil if I’m preparing a meal or hot drink. This is probably more than is required, but I’d rather be safe than get ill while in a remote location.
Self-care kit
- Toileting – you’ll need to consider how you’ll manage going to the toilet while in the mountains (It’s also worth baring this in mind for day hikes). Be prepared to have the 3 P’s (Peeing, Pooing and Periods) conversation with your group, to help break down any barriers, and encourage an open conversation. There are two ways of dealing with going to the loo outdoors, but one is becoming more acceptable than the other; You could choose to bury waste, staying away from campsites and water sources, however, packing out is the better option. Leave no trace is always the best option. Much like dog waste, it’s not too difficult to double bag and store waste in a leak proof container, until you get back to civilisation, and then you can dispose of it.
- Washing – You might be tempted to bathe in a river or stream, but when you think about this as your water source, it becomes less appealing. Add in soap and other products and you’ll start to contaminate the environment. I tend to use a dry shower product to clean myself up without leaving chemicals behind, and then just embrace the slightly grizzled look.
- Medication – beyond the standard painkillers you might carry in a first aid kit, remember to carry any other personal medications you might need. The last thing you want when your several hours walk from anywhere is to realise you’ve forgotten a critical medication that might lead to you becoming unwell.
On my list to buy:
Aside from the items above, there are a few items I’m planning to buy now that I’m qualified and planning to take paying groups out with me:
- Supalight Bothy – I’m planning to buy a few Supalight bothies to cover multiple group sizes. While I have a 4-person shelter that does the job, I’m always reluctant to carry it as it’s bulky and heavy. Supalight ones are definitely worth it if you’ll be on the hill a lot.
- Mountain Leader First Aid Kit – I’m also planning to buy an off the shelf ML First Aid Kit. I’ll need to add a few bits and take a few out to meet my needs, but they offer a neat solution for organising everything and will allow me to incrementally replace stuff going forward as and when I use it, or make an informed decision whether I need it if it’s unused when it reaches its expiry.
- Satellite Communicator – I’ve been looking at Satellite Communication devices for a while and will look to invest in one soon. I’ll likely get the Garmin inReach Mini 2 which offers 2-way communication when you’re off grid but not in an emergency, with the option of hitting the SOS button to get a 24/7 co-ordinated response from the Garmin Response